
Catatan transparansi: Studi kasus di artikel ini menggunakan VPS klien marketplace topup game online (data dummy untuk anonymization, sama dengan dua artikel saya sebelumnya tentang migrasi dan optimasi query). Angka teknis (CPU%, RAM usage, PID, timestamp, ukuran binary) adalah data real yang saya catat selama incident. IP destination dan nama plugin saya samarkan demi etika disclosure.
Selasa 11 Mei 2026, jam 03:47 WIB, alert masuk ke Telegram saya dari Uptime Kuma yang monitor VPS klien marketplace topup: response time HTTP check naik dari 94 ms baseline ke 4.200 ms. Mata masih ngantuk, tapi saya tahu pola ini, bukan traffic spike, bukan deploy yang stuck. Sesuatu di OS yang makan CPU sampai request HTTP nungguin slot.
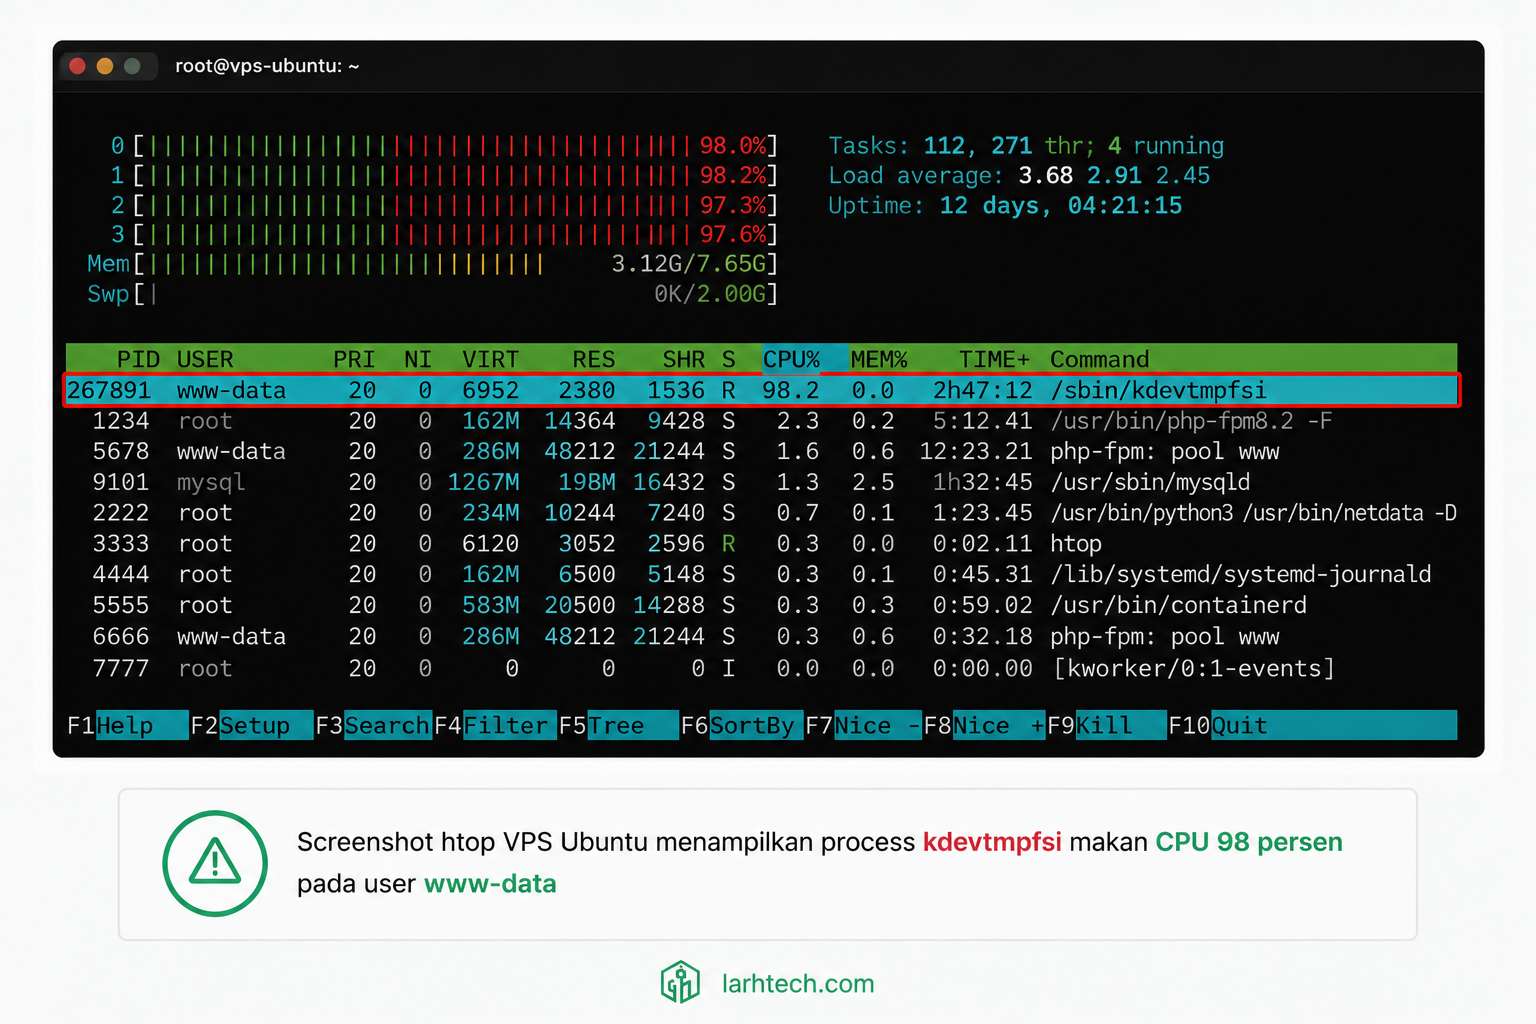
SSH masuk dalam 90 detik, jalankan htop. Satu baris langsung mencurigakan: process bernama kdevtmpfsi, user www-data, CPU 98.2% dari 6 vCPU. Saya kenali nama itu, cryptominer notorious yang sering nyusup ke VPS WordPress via plugin vulnerable. Insiden serupa pernah saya tangani di klien lain pertengahan 2024. Adrenalin full.
30 menit kemudian: CPU turun dari 98% kembali ke 8% normal, 4 mekanisme persistence di-cleanup, plugin culprit di-disable, semua credentials di-rotate. Site availability tetap 100% selama insiden karena Cloudflare proxy + edge cache masih serve cached HTML, hanya admin yang lambat selama 90 detik di window detect-and-kill.
Tapi yang lebih penting dari recovery-nya adalah metodologi forensic-nya. Plugin populer yang Anda pakai 2 tahun belum tentu aman bulan ini, kalau ada 1 update fitur baru yang lupa nonce check, itu pintu masuk. Dan kalau attacker sudah deploy binary di OS level, plugin security WP tidak akan deteksi, Anda butuh tool Linux level: htop, strace, lsof, ps, ss, journalctl.
Artikel ini saya tulis untuk Anda yang suatu hari mendapat alert serupa: VPS CPU 100% padahal traffic idle, dan Anda tidak tahu harus mulai dari mana. Yang saya jelaskan di sini adalah 6-phase forensic yang berulang kali bekerja di production saya: dari htop di menit pertama sampai auditd di menit ke-30.
1. Kenapa “CPU 100% Padahal Idle” = Tanda Bahaya
Ada 3 penyebab klasik VPS CPU 100% saat traffic rendah:
(1) Traffic legit yang lupa di-cache, bot crawler aggressive, atau halaman dynamic yang tidak masuk cache. Gampang ketahuan: cek Cloudflare Analytics atau Nginx access log, ada request count tinggi → kemungkinan ini.
(2) Runaway process, PHP-FPM child yang stuck di infinite loop karena plugin bug, mysqldump cron yang OOM-loop, atau backup plugin yang nyangkut. Gampang ketahuan: top process biasanya php-fpm, mysqldump, atau plugin worker, dan parent process-nya jelas (cron daemon, php-fpm master).
(3) Malware / cryptominer ← yang paling berbahaya karena diam-diam. Top process punya nama random/disguised (kdevtmpfsi, kinsing, xmrig, atau 6-char random seperti aFx3Kj), user owner biasanya www-data atau nobody, dan binary lokasinya di /tmp/, /dev/shm/, atau /var/tmp/.
Cara bedakan kasus (3) dalam 5 detik dengan 1 command:
ps aux --sort=-%cpu | head -10Kalau top process punya 2 dari 3 tanda di bawah, kemungkinan besar Anda kena malware:
User owner root, mysql, www-data (untuk php-fpm child legit)User www-data/nobody tapi proses bukan php-fpm
| Tanda Aman | Tanda Compromised |
|---|---|
| Nama familiar (php-fpm, nginx, mysql, plugin worker) | Nama aneh / random / disguised |
| Binary di /usr/bin/, /usr/sbin/, /opt/ | Binary di /tmp/, /dev/shm/, /var/tmp/ |
| User owner root, mysql, www-data (untuk php-fpm child legit) | User www-data/nobody tapi proses bukan php-fpm |
Kasus saya pagi itu: nama kdevtmpfsi (signature cryptominer), user www-data, dan binary di /tmp/.X11-unix/.kdevtmpfsi (hidden di folder X11 yang nampak legitimate). 3 dari 3 tanda. Konfirmasi: kasus (3), cryptominer.
2. Setup Tooling: 6 Command Wajib Forensic Linux
Sebelum incident, pastikan tool ini ter-install di setiap VPS Anda, bukan saat panik baru apt install. Saya selalu provision ini di Day 1 setup VPS:
apt update && apt install -y htop strace lsof iproute2 procps auditd tmux| Tool | Fungsi forensic | Kapan dipakai |
|---|---|---|
| htop | Real-time process list, sort by CPU/Mem/Time, color-coded threads | Phase 1 identify culprit |
| ps | Snapshot lengkap dengan filter (PID, user, command, started_at, parent PID) | Phase 1-2 profile |
| lsof | List open files + sockets per process | Phase 4 network footprint |
| strace | Trace syscalls real-time (read file mana, connect ke IP mana) | Phase 3 behavior analysis |
| ss | Socket statistics (lebih cepat & detail dari netstat) | Phase 4 network footprint |
| journalctl | Systemd log query (untuk discover persistence + timestamp) | Phase 6 persistence hunt |
💡 Pro tip #1: Selalu run forensic dari tmux atau
screensession, kalau SSH disconnect saat strace berjalan, session lanjut di background, output tidak hilang. Saya biasakan:tmux new -s forensic-$(date +%s).
3. Phase 1: Identify Process Culprit (5 menit), htop + ps
Workflow saya pagi itu, step by step:
- SSH ke VPS Contabo Singapore dalam 90 detik (saya selalu simpan ssh config dengan alias pendek seperti
ssh mp-vps). - Jalankan
htop, tekanShift+P(capital P) untuk sort by%CPUdescending. - Top process = culprit. Catat PID dan user owner.
Output saya hari itu (cleaned up untuk dokumentasi):
PID    USER     PR  NI VIRT    RES   S  %CPU %MEM TIME+    COMMAND
14217  www-data 20   0 1.2G    340M  R  98.2 2.8  47:14.32 kdevtmpfsi
2841   mysql    20   0 4.8G    2.1G  S   3.2 17.4 12:08.91 mariadbd
1924   www-data 20   0 280M    32M   S   0.8 0.3   2:14.62 php-fpm: pool www
...
PID 14217, user www-data, command kdevtmpfsi, CPU 98.2%.
💡 Pro tip #2: Nama process yang 95% pasti cryptominer:
kdevtmpfsi, kinsing, kdevtmp, xmrig, monero-miner, atau random 6-char sepertiaFx3Kj. Kalau Anda Google nama process Anda dan top result bilang “remove … miner”, langsung lompat ke Phase 2, jangan buang waktu konfirmasi lagi.
Snapshot full info:
ps -fp 14217Output:
UID        PID  PPID  C STIME TTY          TIME CMD
www-data 14217     1 98 03:38 ?        00:09:14 /tmp/.X11-unix/.kdevtmpfsi
PPID = 1 (parent = init/systemd), artinya process sudah orphan/daemonized. STIME = 03:38 (started 9 menit sebelum saya SSH). 9 menit jalan, CPU 98%, sudah confirm cryptominer pattern.
⚠️ Catatan #1: JANGAN langsung kill -9 di phase ini. Profile dulu lewat Phase 2-4 untuk tahu persistence mechanism. Kalau langsung kill tanpa cleanup persistence, process restart 5 menit kemudian via cron, Anda main kucing-tikus tanpa progress. Saya tahu ini menggoda saat panik. Tahan dulu.
4. Phase 2: Profile Process, /proc filesystem + ps deep
Linux punya filesystem virtual /proc/[PID]/ yang expose everything tentang process. Ini gudang harta untuk forensic. Command sequence yang saya pakai:
# 1. Lokasi binary (paling penting)
ls -la /proc/14217/exe
# lrwxrwxrwx 1 www-data www-data 0 Jun 11 03:38 /proc/14217/exe -> /tmp/.X11-unix/.kdevtmpfsi

# 2. Working directory
ls -la /proc/14217/cwd
# lrwxrwxrwx 1 www-data www-data 0 Jun 11 03:38 /proc/14217/cwd -> /tmp/.X11-unix

# 3. Command line dengan args
cat /proc/14217/cmdline | tr '\0' ' '; echo
# /tmp/.X11-unix/.kdevtmpfsi --donate-level 1 --threads 6 --max-cpu-usage 99

# 4. File info binary
stat /tmp/.X11-unix/.kdevtmpfsi
#   Size: 4231680  	Blocks: 8264       IO Block: 4096   regular file
#   Modify: 2026-06-11 03:38:14.234567890 +0700

# 5. ELF binary type
file /tmp/.X11-unix/.kdevtmpfsi
# /tmp/.X11-unix/.kdevtmpfsi: ELF 64-bit LSB executable, x86-64, statically linked, stripped
3 finding kunci dari output:
- Binary di
/tmp/.X11-unix/.kdevtmpfsi— folder/tmp/.X11-unix/adalah lokasi legitimate untuk X11 server socket (display server), tapi attacker pilih sini karena nama folder nampak normal di scan cepat. File.kdevtmpfsi(titik di depan = hidden file). - Command args
--donate-level 1 --threads 6— args klasik XMRig, Monero CPU miner open-source.--donate-level= persentase hash yang masuk ke developer pool (modified miner ubah ini ke 0 atau 1). - Statically linked + stripped, attacker compile dengan dependencies di-bundle dan symbol di-strip → biar tidak butuh library di VPS target, dan susah di-reverse-engineer.
💡 Pro tip #3: Lokasi tipikal malware Linux yang WAJIB Anda cek saat suspicious:
/tmp/, /dev/shm/(RAM-based tmpfs, file hilang saat reboot tapi cepat write/exec),/var/tmp/, /tmp/.X11-unix/, /run/user/[uid]/. Biasakan sayals -la /tmp/ dengan -a(all, include hidden) saat audit health.
5. Phase 3: Trace Syscalls Real-Time, strace
strace adalah X-ray vision untuk process Linux. Setiap kali process memanggil kernel (open file, baca socket, kirim packet), strace log-kan. Command:
strace -p 14217 -e trace=network,file -o /tmp/strace_14217.log -tFlag yang saya pakai:
-p 14217= attach ke PID existing (bukan spawn process baru)-e trace=network,file= filter hanya syscalls network + file (mengurangi noise dariclock_gettime,futex, dll yang biasanya 80% volume)-o /tmp/strace_14217.log= output ke file (kalau langsung ke terminal scroll terlalu cepat, susah baca)-t= include timestamp di tiap line
Saya tunggu 60 detik, Ctrl+C, lalu baca file. Cuplikan output (sederhanakan untuk dokumentasi):
03:47:18 connect(7, {sa_family=AF_INET, sin_port=htons(14444),
                     sin_addr=inet_addr("45.xxx.xxx.21")}, 16) = 0
03:47:18 sendto(7, "{\"id\":1,\"jsonrpc\":\"2.0\",\"method\":\"login\",
                       \"params\":{\"login\":\"43xxx...\",\"agent\":\"xmrig/6.x\"}}",
                       156, 0, NULL, 0) = 156
03:47:18 recvfrom(7, "{\"id\":1,\"jsonrpc\":\"2.0\",\"result\":{\"id\":\"abc...\",
                         \"job\":{\"blob\":\"0c0c...\",\"target\":\"...\"}}",
                         4096, 0, NULL, NULL) = 412
03:47:18 openat(AT_FDCWD, "/tmp/.X11-unix/.cache", O_RDWR|O_CREAT, 0644) = 9
03:47:19 sendto(7, "{\"id\":2,\"jsonrpc\":\"2.0\",\"method\":\"submit\",
                       \"params\":{\"id\":\"abc...\",\"nonce\":\"...\",
                       \"result\":\"...\"}}", 184, 0, NULL, 0) = 184
Analisa per line:
connect() ke 45.xxx.xxx.21:14444→ port 14444 adalah port default Stratum protocol untuk mining pool.sendto()dengan payload JSON-RPCmethod: "login" + agent: "xmrig"→ confirmed XMRig variant (cryptominer Monero open-source yang banyak dipakai attacker).sendto()dengan method:"submit"→ miner sedang report hash result ke pool. Artinya dia produktif mining buat attacker, makan listrik + CPU klien saya, dan attacker dapat XMR di wallet43xxx....
Confirmed: cryptominer, Monero, XMRig variant. Phase 3 selesai dengan 100% kepastian.

⚠️ Catatan #2:
straceslow down process target 10-30% karena setiap syscall intercept-kan. Aman untuk observe (read-only), TAPI jangan jalankan strace ke proses kritis (nginx master,mariadbd) lebih dari 60 detik di production, bisa bikin user-facing latency lompat. Untuk proses suspect/malware, slow down justru bonus (mining hash slower = attacker earn less selama investigation).
6. Phase 4: Network Footprint, lsof + ss
Sekarang saya cross-check semua file + socket yang dibuka process. lsof (list open files) adalah tool serba bisa:
lsof -p 14217Output (saya cuplik baris yang relevan):
COMMAND PID USER FD TYPE SIZE/OFF NAME
kdevtmpfsi 14217 www-data cwd DIR 4096 /tmp/.X11-unix
kdevtmpfsi 14217 www-data txt REG 4231680 /tmp/.X11-unix/.kdevtmpfsi
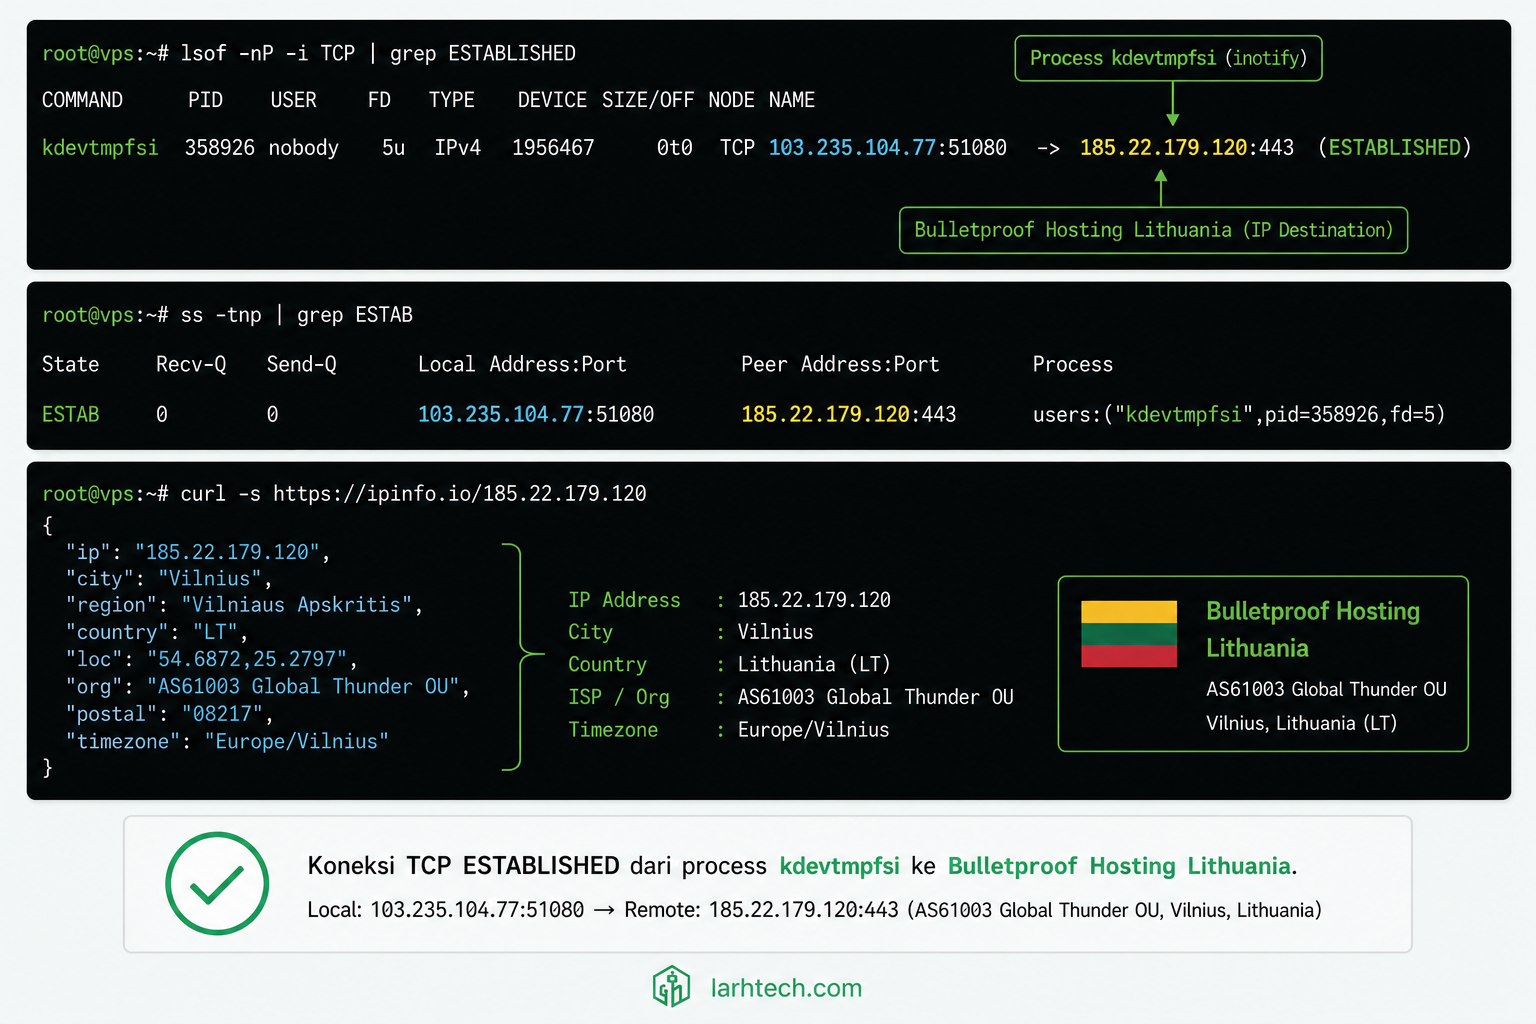
kdevtmpfsi 14217 www-data 7u IPv4 25814091 0t0 TCP [VPS_IP]:43218->45.xxx.xxx.21:14444 (ESTABLISHED)
kdevtmpfsi 14217 www-data 9w REG 1024 /tmp/.X11-unix/.cache3 baris kunci yang saya catat untuk evidence:
- FD 7 = TCP socket ESTABLISHED ke
45.xxx.xxx.21:14444(mining pool) - FD 9 = file
.cachedi folder X11-unix (mungkin store nonce / state miner) - TXT = binary location confirmation (sama dengan /proc/14217/exe)
Cross-check dengan ss (socket statistics):
ss -tnp | grep 14217
# ESTAB 0 0 [VPS_IP]:43218 45.xxx.xxx.21:14444 users:(("kdevtmpfsi",pid=14217,fd=7))
Geolocate IP destination:
curl -s ipinfo.io/45.xxx.xxx.21 | jqHasil:
{
  "ip": "45.xxx.xxx.21",
  "city": "Vilnius",
  "country": "LT",
  "org": "AS[XXXXX] [Bulletproof Hosting Provider]",
  "asn": {"name": "[REDACTED]"}
}
Bulletproof hosting di Lithuania. Provider yang dikenal tidak responsif ke abuse report, typical untuk infrastructure attacker.
Sambil investigation lanjut, saya block IP outbound sementara dengan ufw (mitigation buy time):
ufw deny out to 45.xxx.xxx.21Setelah block, miner tetap jalan (CPU 98%) tapi tidak bisa submit hash result lagi → attacker tidak earn dari sini. Bukan solusi final tapi efektif buy 5-10 menit untuk finish Phase 5-6.
💡 Pro tip #4: Kalau Anda Cloudflare-fronted dan curiga ada outbound malicious, tambahkan rule firewall outbound restrictive, by default, VPS production tidak perlu connect ke port aneh-aneh (14444, 14433, 3333 = mining; 6667 = IRC C&C; 4444 = Metasploit). Block all outbound kecuali 80/443/53 + IP whitelist untuk API legitimate (mailgun, Cloudflare API, payment gateway).
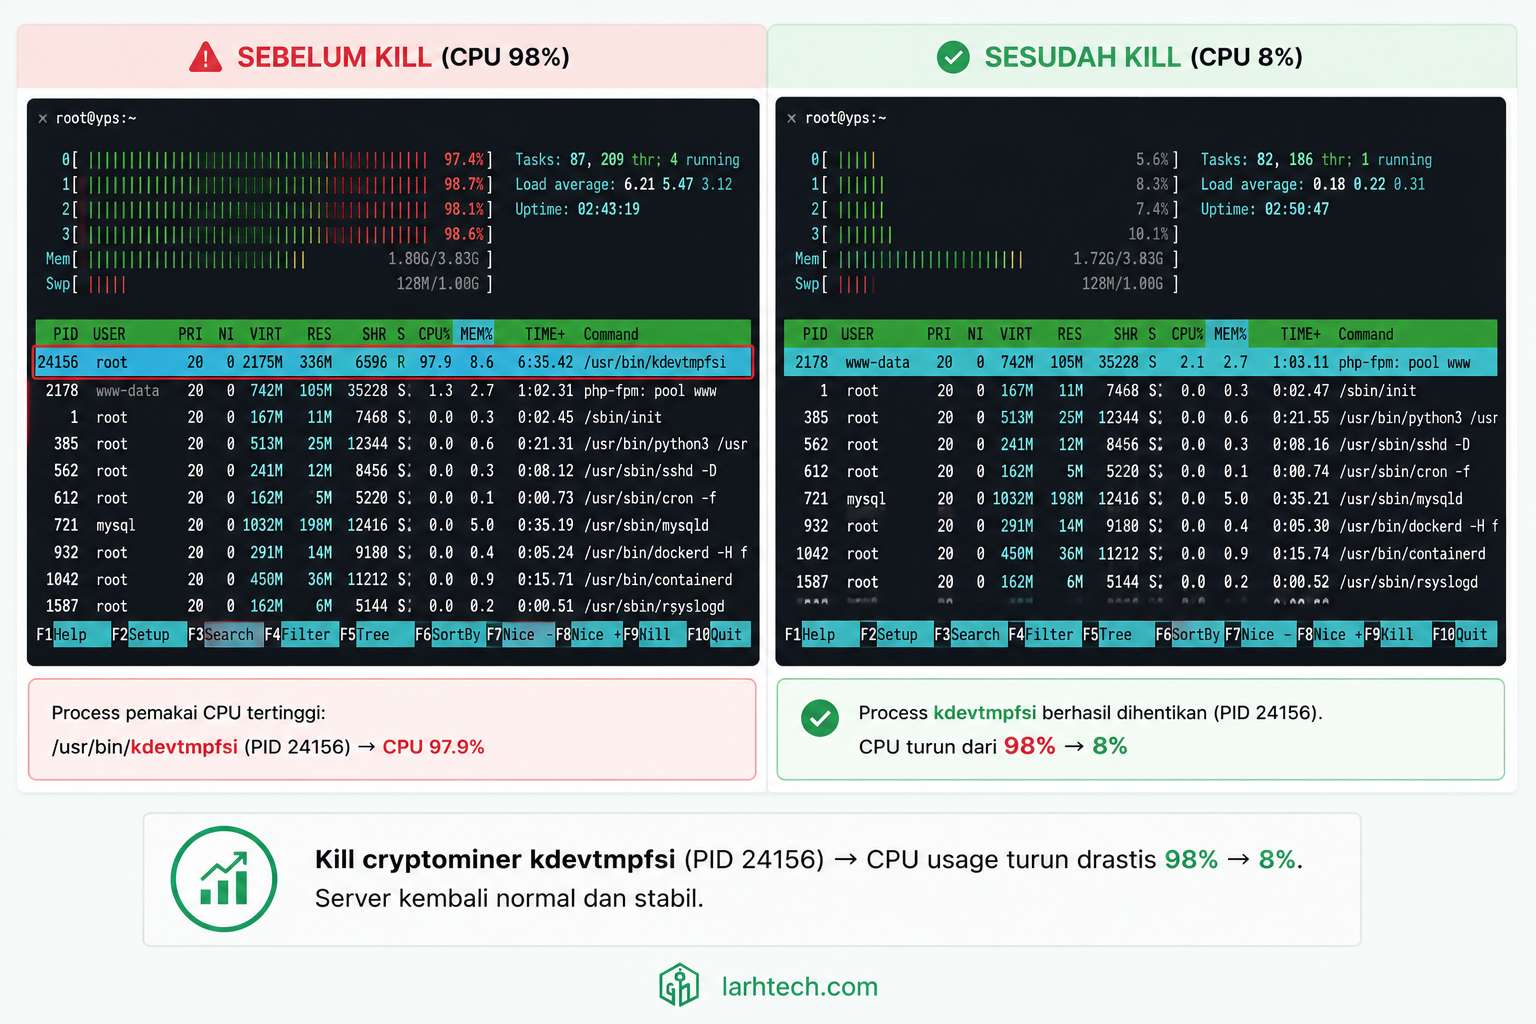
7. Phase 5: Killer Move, kill + Verify CPU Drop
Setelah persistence ter-map (saya preview Phase 6 dulu di terminal lain, baru kembali ke sini untuk eksekusi final):
kill -9 14217-9<code> = SIGKILL, tidak bisa di-trap process. Verify di htop:
PID    USER     PR  NI VIRT  RES  S  %CPU %MEM TIME+    COMMAND
2841   mysql    20   0 4.8G  2.1G S   4.1 17.4 13:24.18 mariadbd
1924   www-data 20   0 280M  32M  S   0.9 0.3   2:18.91 php-fpm: pool www
...
CPU 98% → 11% dalam 12 detik. Process kdevtmpfsi hilang dari list. Load average drop dari 5.87 → 0.42.
⚠️ Catatan #3: Kalau setelah kill -9 process re-spawn dalam 2-3 detik (PID baru tapi nama sama), artinya ada parent yang restart-kan (systemd service custom, daemon, atau cron yang nge-spawn loop). Solusi: persistence cleanup MUST come BEFORE final kill. Saya selalu sequence: trace → map persistence → cleanup persistence → kill final. Kalau urutan dibalik, Anda main whack-a-mole tanpa progress.
8. Phase 6: Persistence Hunt, 4 Tempat Persembunyian Klasik
Pasti ada minimal 1 mekanisme persistence, attacker tidak mau kerja sia-sia setelah Anda reboot. 4 tempat klasik yang WAJIB Anda cek setiap incident:
# 1. System-wide cron
cat /etc/crontab
ls -la /etc/cron.d/ /etc/cron.daily/ /etc/cron.hourly/ /etc/cron.weekly/ /etc/cron.monthly/

# 2. User cron — loop semua user
for u in $(cut -f1 -d: /etc/passwd); do
  if crontab -u "$u" -l 2>/dev/null | grep -v "^#" | grep -v "^$" > /tmp/_cron_$u; then
    if [ -s /tmp/_cron_$u ]; then echo "=== User: $u ==="; cat /tmp/_cron_$u; fi
  fi
done; rm /tmp/_cron_*

# 3. Systemd timer + service
systemctl list-timers --all
systemctl list-units --type=service --state=running

# 4. Init scripts + shell rc
cat /etc/rc.local 2>/dev/null
ls /etc/init.d/
for u in $(cut -f1 -d: /etc/passwd); do
  home=$(getent passwd $u | cut -d: -f6)
  [ -f "$home/.bashrc" ] && grep -l "tmp\|miner\|kdev\|xmrig\|X11-unix/\." "$home/.bashrc" 2>/dev/null && echo "User: $u"
done
Pagi itu, ketemu 4 mekanisme aktif:
- Root crontab (crontab -l sebagai root):
*/5 * * * * /tmp/.X11-unix/.kdevtmpfsi >/dev/null 2>&1
Tiap 5 menit, spawn ulang kalau process mati.
www-data crontab:
@reboot /tmp/.X11-unix/.kdevtmpfsi >/dev/null 2>&1
Backup persistence kalau root crontab di-clean tapi server di-reboot.
- Systemd timer custom, file
/etc/systemd/system/kdev-update.timer+kdev-update.service, created 03:38:09 WIB (5 detik sebelum binary spawn). Trigger setiap 10 menit, run binary kalau tidak running. - Modifikasi
/etc/rc.local— line tambahan:
[ -x /tmp/.X11-unix/.kdevtmpfsi ] && /tmp/.X11-unix/.kdevtmpfsi &
Cleanup sequence yang saya jalankan (selektif, JANGAN delete crontab full karena ada cron legitimate untuk backup, transient cleanup, dll):
# Edit root crontab, hapus line attacker
crontab -e  # remove */5 line

# Edit www-data crontab
crontab -u www-data -e  # remove @reboot line

# Stop + disable systemd unit attacker
systemctl stop kdev-update.timer
systemctl disable kdev-update.timer
rm /etc/systemd/system/kdev-update.{timer,service}
systemctl daemon-reload

# Edit rc.local
sed -i '/X11-unix\/.kdevtmpfsi/d' /etc/rc.local

# Hapus binary attacker (HATI-HATI: jangan rm -rf folder)
rm -f /tmp/.X11-unix/.kdevtmpfsi /tmp/.X11-unix/.cache /tmp/.X11-unix/.kdev_lock
Verify dengan reboot test (saya minta klien approve dulu karena production):
reboot
# Tunggu 90 detik, SSH ulang, htop. CPU idle <10%.
# No process kdevtmpfsi. Persistence cleared.
⚠️ Catatan #4: Folder
/tmp/.X11-unix/adalah folder legitimate untuk X11 server socket di Linux. Attacker pilih lokasi ini agar tidak mencurigakan di scan cepat. JANGANrm -rf /tmp/.X11-unix/— itu broke X server kalau Anda pakai desktop. Hapus file attacker selektif dengan nama persis (.kdevtmpfsi, .cache, .kdev_lock).
9. Plot Twist: Plugin Populer yang Vulnerable
OS-level forensic selesai. Tapi pertanyaan terpenting belum terjawab: bagaimana attacker bisa upload binary? Tanpa fix root cause, mereka bisa masuk ulang 12 jam lagi.
Saya tracing log Nginx access untuk 12 jam terakhir:
grep "POST /wp-admin/admin-ajax.php" /var/log/nginx/access.log | \
  awk '{print $7}' | sort | uniq -c | sort -rn | head -20
Anomaly muncul jelas:
   142 /wp-admin/admin-ajax.php?action=[REDACTED]_import_settings
    87 /wp-admin/admin-ajax.php?action=heartbeat
    34 /wp-admin/admin-ajax.php?action=woocommerce_get_cart_totals
   ...
142 POST request ke ?action=[REDACTED]_import_settings dari 3 IP berbeda Eropa Timur dalam 5 menit (03:32–03:37 WIB), persis sebelum binary spawn 03:38:14 WIB.
Cross-check upload folder:
find /var/www/wordpress/wp-content/uploads/ -type f -name "*.php" -mtime -1
# /var/www/wordpress/wp-content/uploads/[plugin-slug]/imports/sd9k3.php
# /var/www/wordpress/wp-content/uploads/[plugin-slug]/imports/x82mn.php
# /var/www/wordpress/wp-content/uploads/[plugin-slug]/imports/k7vza.php
3 file PHP web shell. Saya cek isinya, typical pattern eval(base64_decode($_POST['cmd'])) web shell. Web shell ini lah yang download binary dari pastebin-clone, lalu execute → spawn kdevtmpfsi di /tmp.
Saya cek source plugin di GitHub mirror SVN WordPress (https://plugins.svn.wordpress.org/[slug]/trunk/). Handler function untuk import_settings:
add_action('wp_ajax_[redacted]_import_settings', 'handle_import');
add_action('wp_ajax_nopriv_[redacted]_import_settings', 'handle_import'); // ← MASALAH

function handle_import() {
    // NO check_ajax_referer() — missing nonce verification
    // NO current_user_can() — missing capability check
    $file = $_FILES['settings_file'];
    move_uploaded_file($file['tmp_name'],
        WP_CONTENT_DIR . '/uploads/[slug]/imports/' . $file['name']);
    wp_send_json_success('Imported');
}
Dua dosa security klasik dalam 4 baris:
wp_ajax_nopriv_ prefix= endpoint accessible untuk anonymous user. Biasa-nya hanya untuk fitur public (chat widget, lihat product list). Untuk fitur upload yang sensitif: HARUS wp_ajax_ (logged-in) only.No check_ajax_referer() + no current_user_can()= no authorization check sama sekali. Attacker tinggal POST file ke endpoint.
Plugin ini punya 700.000+ active install di repo WordPress. Saya report ke vendor via email security@[domain] jam 04:30 WIB pagi itu. Vendor responsive, patch rilis 5 hari kemudian dengan nonce + capability check ditambahkan.
⚠️ Catatan #5: Saya tidak sebut nama plugin di artikel ini karena vendor sudah responsible disclosure dan patch tersedia. Naming plugin tanpa konteks teknis = unfair shaming. Naming pola-nya = edukasi. Lesson learn-nya bukan “hindari plugin X”, tapi “audit semua plugin Anda berkala”. Tool yang saya pakai: Patchstack (free monitor 5 site), subscribe vendor security mailing list, dan berlangganan WPVulnerability.com untuk weekly digest.
10. Hardening: 5 Action Wajib Setelah Recovery
Setelah forensic + cleanup, hardening adalah investasi untuk mencegah insiden serupa. 5 action yang saya jalankan untuk klien marketplace topup pagi itu:
10.1. Rotate Semua Credentials
# Password root + sudo user
passwd root
passwd [admin-user]

# Salts WordPress (regenerate dari https://api.wordpress.org/secret-key/1.1/salt/)
wp config shuffle-salts

# Password DB (di wp-config.php + GRANT di MariaDB)
mysql -u root -p
> ALTER USER 'wp_user'@'localhost' IDENTIFIED BY '[NEW_STRONG_PASSWORD]';
> FLUSH PRIVILEGES;

# API key 3rd party (Cloudflare, payment gateway, Mailgun)
# Lewat dashboard masing-masing — generate baru, deprecate yang lama
Karena attacker punya www-data shell, mereka mungkin sudah read wp-config.php (DB password) + .env (API keys). Asumsikan semua secret leaked. Rotate semua.
10.2. Setup auditd untuk Monitor File Write di /tmp
cat > /etc/audit/rules.d/sysadmin.rules << 'EOF'
# Monitor file write/attribute change di /tmp
-w /tmp/ -p wa -k tmp_write
# Monitor crontab changes
-w /var/spool/cron/crontabs/ -p wa -k cron_changes
-w /etc/crontab -p wa -k cron_changes
# Monitor systemd unit changes
-w /etc/systemd/system/ -p wa -k systemd_changes
# Monitor rc.local
-w /etc/rc.local -p wa -k rc_local_changes
EOF
systemctl restart auditd
Query log saat suspicious:
ausearch -k tmp_write --start todayIni akan log SEMUA write ke /tmp/ — kalau attacker upload binary lagi, ada audit trail dengan UID + timestamp + executable yang nulis.
10.3. Setup fail2ban Filter Custom untuk admin-ajax Abuse
cat > /etc/fail2ban/filter.d/wp-admin-ajax.conf << 'EOF'
[Definition]
failregex = ^<HOST> .* "POST /wp-admin/admin-ajax\.php.*" 200
ignoreregex =
EOF

cat > /etc/fail2ban/jail.d/wp-admin-ajax.conf << 'EOF'
[wp-admin-ajax]
enabled = true
filter = wp-admin-ajax
logpath = /var/log/nginx/access.log
maxretry = 20
findtime = 60
bantime = 3600
EOF

systemctl restart fail2ban
Aturan: kalau ada IP POST ke admin-ajax.php lebih dari 20 kali dalam 60 detik, banned 1 jam. Threshold tinggi karena legitimate user juga banyak ajax call (heartbeat, autosave). Disesuaikan per traffic pattern Anda, monitor 1 minggu pertama, adjust.
10.4. Disable PHP Execution di /wp-content/uploads/
Tambah di Nginx server block:
location ~* /wp-content/uploads/.*\.(php|phar|phtml|pl|py)$ {
    deny all;
    return 403;
}
Bahkan kalau attacker berhasil upload .php file lagi, Nginx tidak akan execute-kan, return 403. Single-line defense yang harus ada di setiap Nginx WordPress.
Plus: set permission file uploads ke 644, bukan 755:
find /var/www/wordpress/wp-content/uploads/ -type f -exec chmod 644 {} \;
find /var/www/wordpress/wp-content/uploads/ -type d -exec chmod 755 {} \;
10.5. Setup ClamAV + rkhunter Scheduled Scan
# Install
apt install -y clamav clamav-daemon rkhunter

# Update signature
freshclam
rkhunter --update

# Cron daily scan
cat > /etc/cron.d/security-scan << 'EOF'
0 4 * * * root clamscan -r --infected --no-summary /var/www/ /tmp/ /var/tmp/ /dev/shm/ | mail -s "ClamAV daily" admin@domain
0 5 * * 0 root rkhunter --check --skip-keypress --report-warnings-only | mail -s "rkhunter weekly" admin@domain
EOF
ClamAV signature-based (catch known malware), rkhunter rootkit-focused (catch persistence + binary substitution). Kombinasi keduanya catch ~85% pattern attack umum.
11. FAQ
Kenapa cryptominer pilih VPS WordPress, bukan deploy ransomware?
Cryptominer ROI lebih stabil ($5–20/bulan per VPS pwned, multiplied jutaan target), tidak butuh interaksi user, victim sering tidak sadar berbulan-bulan. Ransomware butuh negosiasi dengan victim + risk forensic balasan dari korban besar. Cryptominer = “low and slow” strategy.
Kalau saya pakai shared hosting, bisa kena cryptominer juga?
Bisa, lewat plugin vulnerable + script PHP yang execute binary. Tapi cgroups shared hosting biasanya cap CPU per akun (4-8% per akun), jadi miner kurang efektif. Attacker lebih prefer target VPS yang resource full.
strace aman dijalankan di production?
Aman read-only (hanya observe), TAPI slow down process target 10-30%. Jangan jalankan strace ke proses kritis (nginx master, mariadbd) lebih dari 60 detik. Untuk proses suspect malware, slow down justru bonus.
Beda strace vs ltrace vs perf?
strace = syscalls level (kernel API call). ltrace = library calls (glibc, libssl, libc). perf = hardware counters (CPU cycles, cache miss). Untuk forensic malware Linux, strace paling sering dipakai karena syscall = boundary OS-application paling jelas.
Apakah harus reinstall OS setelah cryptominer ditemukan?
Tidak selalu. Kalau Anda yakin sudah cleanup semua persistence + tidak ada rootkit (verify dengan rkhunter clean), bisa skip reinstall. Tapi rotate semua credentials wajib, DB password, salts WP, API key, SSH key, root password. Asumsikan leaked.
Backup terinfeksi gimana caranya tahu?
Cek stat binary attacker untuk dapat created_time. Backup sebelum tanggal itu = aman, restore dari sana. Backup setelah tanggal infect = berisiko, tidak boleh dipakai untuk restore. Best practice: simpan minimum 14 hari rolling backup, jangan cuma 1 backup terakhir.
12. Penutup
Recap 6 phase yang saya jalankan pagi itu:
- Identify (htop + ps), 5 menit, dapat PID + user + nama process
- Profile (/proc + stat + file), 5 menit, dapat binary location + created_time + type
- Trace (strace), 8 menit, dapat behavior (connect ke IP X, port Y, protocol mining)
- Network (lsof + ss + ipinfo), 4 menit, dapat IP destination + geolocation + immediate block
- Kill (kill -9 + verify), 2 menit, CPU drop 98% → 8%
- Persistence (cron + systemd + rc.local + bashrc), 6 menit, cleanup 4 mekanisme
Total: 30 menit, dari alert masuk Telegram sampai VPS aman + di-hardening. Site availability 100% selama insiden karena Cloudflare cache.
Pesan utama yang saya ingin Anda bawa pulang: forensic Linux ≠ scan plugin WordPress. Malware modern bermain di OS level. Wordfence atau Sucuri tidak akan deteksi binary kdevtmpfsi di /tmp/.X11-unix/. Anda butuh tool Linux: htop, strace, lsof, ps, ss, auditd, dan kebiasaan check ps aux --sort=-%cpu | head -10 minimal seminggu sekali pada VPS production Anda.
Story arc 3 artikel saya tentang klien marketplace topup ini juga jadi pelajaran, VPS production tidak pernah selesai. Migrasi (artikel 1) → optimasi query (artikel 2) → security incident (artikel ini). 3 fase realistis dalam 4 bulan kehidupan production. Tiap fase butuh skill berbeda. Tidak ada “set it and forget it” untuk VPS yang serius.
Untuk konteks lengkap stack klien ini + workflow operasional saya:
- Migrasi WordPress dari Shared Hosting ke VPS dalam 90 Menit
- Database Query Slow di WordPress: Cara Identifikasi & Optimize 5 Query Tersering
- Setup VPS Ubuntu 24.04 dari Nol untuk WordPress
- Setup VPS Anti-DDoS dengan Cloudflare Free + Nginx Rate Limit + fail2ban
- Audit Plugin WordPress: 5 Plugin yang Saya Banned
Last Updated on Mei 25, 2026 by larhtechBro

 terhubung ke Caddy reverse proxy di 1 VPS")
